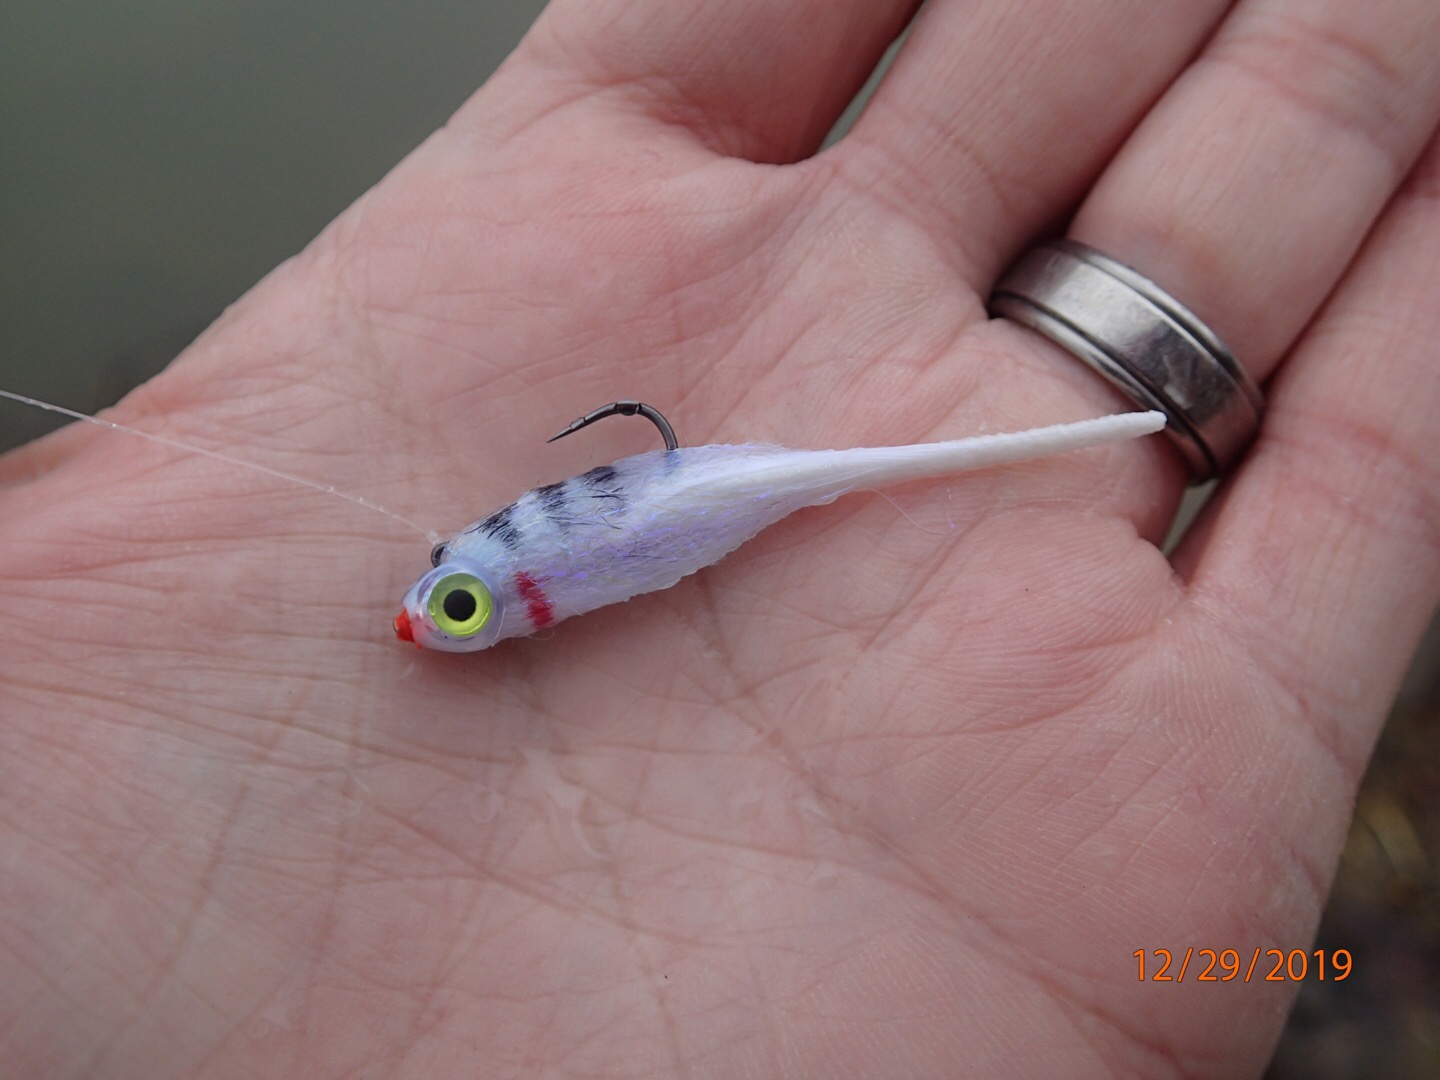
Over the past several weeks, numerous requests have been made for a tutorial on the balanced minnow pattern I have been fishing over the past few months and sharing online. After several months of testing and tweaking, here's the version I have ultimately settled on. When I started testing with this pattern, I had a very specific need to meet: a balanced baitfish pattern with detail that I could suspend under an indicator for selective or lethargic fish. For years, I attempted to make near-neutral buoyancy patterns for cold water crappies and bass, wanting to put the fly in front of fish faces and hang it there to promote eats. I failed. A lot. Ultimately, I came to a realization that I was going about it all wrong. Weight the fly instead, balance it, and suspend it under an indicator a la the old jig and bobber technique that has fooled fish for eons. It's an easier way to present the fly, and depth control is also much easier. Balanced flies were new to me before my Utah trips over the past two years, so I have the Fly Fish Food boys to thank for my introduction to balanced flies. I have, to this point, denied giving this pattern a name. In my opinion it's basically a balanced Baby Fat minnow with a few minor tweaks. Enough for a new pattern name? Ehh, not so sure. What it's called doesn't matter at all to me, all I care about is that it works.
Recipe:
Hook - Hanak 400 size 8
Weight - 3.5mm tungsten bead on a pin for balance
Thread - 70den UTC or anything similar you like/prefer
Tail - strip of Cohen's Fly Suede and marabou
Underbody - Ice Dub
Body - streamer dubbing like Bruiser Blend or Laser Dub
Head - 4mm Fish Mask
1) Begin by sliding the bead onto the pin. I use Darice fabric pins for balanced patterns. The bead should rest under the hook eye, and be sure to leave some space to tie in materials in front of the bead, as shown below. The bead color doesn't matter, it should never be visible.

2) Cut a strip of Fly Suede with scissors or a guillotine-style paper cutter (that's what I use). The piece should be about 1.5" long and taper slightly narrower towards a point.

3) Tie the strip onto the belly side of the hook (will ride point-up) with the narrower end of the tail pointing back. The tail will look a bit long, and that's perfect. The strip of Fly Suede will wriggle and undulate very easily in the water when wet, and the material stays fairly buoyant in the water so the tail won't sag. It's also nearly indestructible.

4) Tie in two small clumps of marabou, one to each side of the hook, that extends slightly beyond halfway down the Fly Suede tail. I like the fluffy marabou stripped from bugger marabou for this, but any marabou you have will work.

5) Loosely dub a thick rope of Ice Dub, UV Pearl here, for an underbody. Be sure to wrap all the way to the bead. It helps at this point to use a few cross wraps of thread over the bead to hold it firmly in place.

6) Use a brush or piece of Velcro and pick out the Ice Dub a bit. It should look a little ragged and frayed. If there are any long fibers that bother you, simply pluck them out, but they won't hurt anything. Advance your thread to in front of the bead.

7) Rip-stack a small clump of streamer dubbing, here white Laser Dub, and tie it in facing forward on the belly side of the pin. It should be long enough to extend back just past the hook bend when you pull it back to the rear of the fly. Trim any butts near the bead.

8) At this point, you can get as creative as you want. Color combos are nearly limitless, from solid colors to custom mixes and hot spots. This is also the most difficult part of this fly and a part you need to develop a "feel" for, how much dubbing you can use. There's limited real estate under a 4mm Fish Mask, and you need to be able to get the mask over the dubbing. Also, leave a little space on the front of the pin for more thread. For this demo, I used a pale blue for the "back" with neon chartreuse hot spots on the cheeks/sides. All of the streamer dub should be similar in length. If anything, you can have the top/back color be a tad longer but it should be virtually identical. Whip finish behind the dubbing and cut the thread.

9) The mask will need to be slightly modified to accommodate the jig hook eye. If your Fish Masks are the newer versions made from softer material, a sharp pair of scissors can be used to notch them. If they are the older, harder plastic, use a heat source like a cautery tool or a heated bodkin to melt the notch in. If you try to cut the harder plastic masks, they tend to break.

10) Stroke the dubbing back and test fit the Fish Mask. When you're sure it fits, remove it and put a drop of gel CA glue on the inside of the mask and slide it back on. Reattach the thread to the front of the pin to form a thread dam in front of the mask.

11) The easiest way to finish the thread dam is to apply some liquid CA glue to the thread, make a few wraps, then cut it after a few seconds for the glue to dry. If you get too much thread on the tiny pin in front, you can have issues with the thread slipping off. Now you can use a brush and brush the fibers back and around the hook point.

12) Another chance to get creative! Add markings if you wish using markers of your choice. I use black Sharpies for barring and a fine point red Sharpie for a gill slit behind the mask. Totally not required, but if you want to add more detail, this is the chance to do it.

13) Add 3D eyes to the Fish Mask, I secure them with a drop of gel CA. I also apply a liberal dose of Sally Hansen's Hard as Nails to the thread and front of the mask, then hang the fly vertically while the Hansen's dries. It's an extra level of protection for the thread and helps make the fly extremely durable.

Once you dive in with this pattern, you'll see how much you can change and tweak colors for different effects. The Fly Suede takes marker really well, so you can add color to it if you want. Change the underbody color of Ice Dub to something bright for a bleed-through effect or hot spot. Color combos on the streamer dubbing are practically never ending. Use a bright thread for the thread dam for a hot spot. Match your local baitfish or tie something bold and hot to get the fish's attention. It's all up to you and your imagination.
When the fly gets wet, the combination of the streamer dubbing over the picked-out Ice Dub gives a really translucent look. My biggest concern in first tying the pattern was how durable the pin assembly would be after several eats. Thus far, in over 3 months of testing, I have had one bent pin/head, and that was more due to me being too forceful removing the fly from a fish.

When it comes to fishing the fly, I have found that this size fly/bead is perfect for a size small Thingamabobber. It's just enough weight to slightly "squat" the indicator, which is perfect for picking up subtle takes on cold weather fish. I fish this pattern for crappies in Ohio, mostly, with a lot of bonus bass taking it as by-catch. The key with crappies is getting the fly to the right depth. In cold water, they tend not to chase as much. That's where this presentation is deadly, because you can fine-tune depth and hang the fly right in their face. The pattern is versatile, though. Casting and stripping it traditionally is productive when fish are more aggressive. I also like to tight line this pattern with no indicator to bounce bottom in moving water.


Love this fly. I'm really looking forward to fishing it a bit when the water actually becomes unfrozen here!
ReplyDeleteWill
Thanks for posting this info. I just want to let you know that I just check out your site and I find it very interesting and informative
ReplyDeletewordpress
ufa88kh.blogspot
youtube
stars casino online
Aa
ReplyDelete