Thursday, March 1, 2018

Tying Tutorial: The Improved Bluegill Spider

Probably my favorite fly to fish for panfish on local waters, when the fish are willing to rise, is a simple foam spider.  It's an extremely simple and effective fly.  The only problem I have ever had with this pattern is that it's not buoyant enough to float even a light dropper fly.  When I fish the spider and see fish near the fly but refusing to come to the surface, I want a dropper but am forced to switch flies or use an indicator to suspend the dropper where I want it.  The original foam spider I have used a lot in the past looks like this.


The thin piece of foam on the back of the fly floats it well right in the surface film and the wiggling legs prove irresistible to a lot of fish.  I toyed with multiple ideas to bump up the flotation on the foam spider, and I feel I finally have the pattern down the way I want it.  It floats incredibly well now, the fish still eat it, and it can support the weight of a small bead head dropper fly.  The recipe is as follows:

Hook - Firehole 633 size 12
Thread - Black 6/0
Legs - Round rubber
Tag - Laser Dub
Body - Black 2mm foam
Underbody - Ice Dub
Indicator - Orange (or other hi-vis color) foam chunk

Begin by tying in the rubber legs to the front, over the hook eye.  I prefer to double a single strand over the thread, tie it down, and fold the legs forward, covering the base of the legs with thread.  The legs should separate naturally under thread tension.


Not 100% needed, but I like to add a red hot spot tag to the rear.  I fold a small clump of Laser Dub over the thread and tie it down.  Trim the tag to end at the length of the bend of the hook.


Next add the rear set of legs.  Again double the strand of round rubber leg over the thread, tie it down, and cover the butts rearward.  It's ok if these legs stand upright a bit because the foam will force them down.


Tie in the strip of foam, ending with your thread at the base of the tag and legs.


The foam strip should be about the width of the hook gap.  I start with a strip about 3" long, and use all but what you see left here (the small chunk is leftover).


Fold the foam strip forward and tie it down with tight thread tension.  Your thread should stay at the same point on the hook, at the base of the tag/legs.


Dub some Ice Dub (I used chartreuse) onto your thread and wrap it tightly up against the base of the folded foam piece.


Fold the foam strip rearward again to create a second fold of foam body and tie it down tightly.  Continue wrapping thread to the hook eye, lashing the foam down securely.


Tie in the legs to each side using a couple of firm wraps to anchor them in place.


Dub around the legs, using the Ice Dub to prop the legs out and split them.  End with your thread near the hook eye.


Fold the foam back on more time and capture it with your thread behind the eye, forming a little foam head on the fly.  Trim the leftover foam strip to be about the length of the middle portion of the foam body.
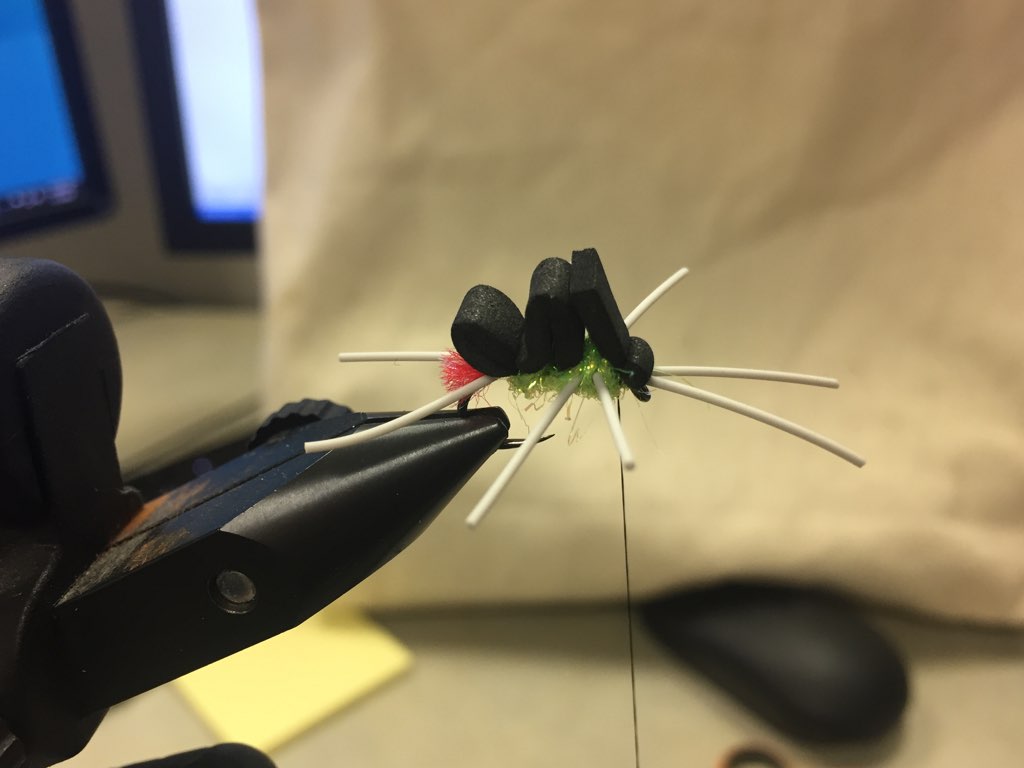

Next tie down a small chunk of foam at the same tie in point for the head.  I prefer orange foam, and a small chunk is perfect.  Even  small piece of bright orange is very visible at a distance on the water.  Whip finish behind the hook eye and trim your thread.


Lastly, trim the leg length to your desired length.


Early testing in the tank with this fly has shown that it floats exceptionally well and has enough buoyancy to float a small bead head dropper (like the Nothin' Special).  Doubling the foam over twice allows for more foam to be packed onto the hook without making the fly too large.  By my estimation, tying the foam in using this method gets roughly three times the amount of foam onto the hook.  I fully expect this bug to get annihilated by bluegill once the weather warms and the fish start moving shallow.  It's a simple fly with materials most folks will have lying around their tying space. 

Wednesday, February 21, 2018

Tying Tutorial: An Unnamed Dragon

Kiley's Damzel Tails have been a material in my tying bins for multiple years now, and I still had not quite figured out the best way to utilize them.  Knowing dragonfly nymphs are a key food source for local creek fish and carp, I kept at it and finally have what I think is my best pattern using the Damzel Tails.  This fly pattern might look complex but it's not all that difficult to produce.  Combining the bent shank hook with medium bead chain eyes gives the fly enough mass to sink slowly and still ride point-up.  Here's the recipe for the pattern:

Hook - DaiRiki 700B size 10
Thread - rusty brown 6/0
Tail - Kiley's Damzel Tail (olive)
Tag - Arizona Diamond Dub (copper olive)
Shell Back - Kiley's Exo Skin (purple/olive)
Abdomen - Stonefly Chenille (olive/black)
Rib - 4lb mono
Eyes - Medium black bead chain
Legs - MFC Sexi Floss (barred olive)
Thorax - Arizona Diamond Dub (copper olive)

To begin, tie in the Damzel Tail to the top of the shank by the rubbery tag.  Make sure this is tied securely.  If not, they can spin on you a bit.


I add a small tag of Diamond Dub on the bottom of the Damzel Tail simply to add some "body" to the tail.  It doesn't hurt that it adds a glimmer of flash, also. 


Next is, in my opinion, the trickiest part of the fly.  Tie in the shell back (I used Exo Skin) to the underside of the hook shank.  Working around the hook point can be a bit of a pain. 


Tie in the chenille a little ahead of the bend of the hook shank, tying it down all the way back to the base of the tail.  This will help add some body to the fly.


Add in the 4lb mono ribbing (you could sub any ribbing you'd like: wire, tippet, etc...).  I leave a bit of space between the ribbing material and the chenille for a good complete turn of chenille behind the ribbing.


Wrap the chenille abdomen forward to the bend of the hook shank, tie it off, and trim the excess.  You can see the space I left between the ribbing and the chenille now.


Stretch the Exo Skin forward (I pull it fairly tight) and tie it down.  Do not trim the excess, it will be used to finish the fly.


Rib the abdomen, tying off the ribbing material and cutting off the excess.  The last two ribbed portions will be ribbed with the tying thread.


Folding the shell back rearward and anchoring it down will both keep it out of the way and provide a little bump to the body that I like.


Tie in your bead chain eyes now, leaving a bit of space between them and the hook eye.


Now the sloppy part: dealing with the legs.  I tie a single strand of Sexi Floss to each side of the fly, angling it rearward towards the tail.  They will tend to stick straight out until you add the dubbing for the thorax.  I also double over a strand of Sexi Floss creating a pair of legs on each side between the end of the abdomen and the eyes.  Do not worry about where these are trying to lay now, th dubbing will help control them.


Dub a somewhat chunky thorax of Diamond Dub.  Use the dubbing to help push the rear legs back, as well as spread and prop out the front legs.  If the leg material is too unruly, using a small hair clip or a few wraps of wire to tame the rear legs can help.


Pull the shell back over the thorax behind the eyes and tie it down with a couple of tight turns of thread.


Dub the head with Diamond Dub going around the eyes and finishing behind the hook eye.  Pull the remaining shell back up to the hook eye and tie it down tightly.  Whip finish, then pull the Exo Skin tight and trim it as close to the eye as you safely can.


Trim the legs to the desired length and you're done.  I trim the rear legs to about the length of the tag of dubbing under the Damzel Tail, and the front legs much shorter/stubbier.  If you wanted to add a clear coat to the shell back, like a UV product, that's entirely up to you.  I choose not to do so because I intend to fish these for carp, and I avoid head cements or any products that might carry a chemical odor on carp flies.  Even with most carp flies on which I have used no cements, I will usually rub some silt into the fly before I fish it to try to knock any human odor off the fly (or conceal it).  I have seen carp refuse flies at the last second a lot where I have used UV resin or Liquid Fusion to form heads, so I do believe they smell something unnatural and refuse some flies.  Tie up a few dragons, fish them hard, and let me know if they catch fish for you!


Tying Tutorial: The Drowned Bee

Bluegills become a target of opportunity for me at certain points of the year.  Early in the year, when the ice is gone and the water is slowly warming, bluegills are always willing to eat.  During their spawn I enjoy targeting the bigger bluegills and sunfish when they come shallow.  Again, late in the fall when the water cools back down, they are still willing to eat.  Bee flies, like the McGinty, have a solid track record in producing bent rods from bluegills.  I've often wondered how I could tie a bee-like pattern with more modern materials and maintain the durability I love from good bluegill flies.  Lots of brainstorming has led to the Drowned Bee, a 100% synthetic fly that should produce well.  The fly is lightly weighted to get it to sink, but will not drop like a rock through the water column.  The recipe is as follows.

Hook - Moonlit ML051 size 8
Thread - yellow 6/0
Bead - 1/8" brass, black
Tag - red Laser Dub
Rib - UV black Ice Dub in a skinny dubbing loop
Abdomen - yellow Ice Dub
Wings - pearl Krystal Flash
Thorax/Legs - black micro polar chenille and black UV Ice Dub

Begin by tying in the red tag.  I fold the Laser Dub over the hook by the bead and lay thread over the material towards the bend.  This helps build the underbody, fattening it up a bit.  Trim the tag short and stubby.


Make a short dubbing loop near the tag and use a material spring or similar method to keep the loop out of the way for now.


Dub a thick body of yellow Ice Dub, leaving a little more than a bead's length of space behind the bead.


I color the dubbing loop with a black Sharpie, then load the loop with a small amount of black UV Ice Dub.  Keep this loop sparse and be sure the material is inserted into the loop as near to the body of the fly as possible.


Rib the abdomen with this thin black UV Ice Dub loop, making open spirals to the space behind the bead.


Typically, the abdomen is really bushy and buggy.  You can leave it as-is if you want, I prefer to trim it cleaner with a pair of scissors.  Try to trim it narrower at the rear, fatter towards the head.


Tie in a clump of pearl Krystal Flash behind the bead, sweeping half of the clump to each side to form the wings.  Pull the flash rearwards after securing it and trim it to the length of the abdomen.  You should end up with two separated wings like this.


Tie in the black Polar Chenille, then dub a little thorax with the UV black Ice Dub.  The dubbing helps bulk up the area behind the bead.


Wrap the polar chenille forward to the bead, tie off, and whip finish.  I again hit the thread with a black Sharpie to help hide the yellow thread.  Snug the whip finish down behind the bead and trim your thread.


View from above showing the segmented bee abdomen and the separated wings.


The Drowned Bee is a fairly simple pattern that is quick to crank out.  It hits on the key elements that I love in bluegill flies: 1) It catches fish, 2) it's extremely durable, and 3) it's a quick bug to tie.


Monday, January 29, 2018

Going Small in Tennessee

This past weekend I made a somewhat unexpected/unplanned trip to eastern Tennessee.  Ordinarily, I'd like to have a week or more to prep flies for even a weekend trip like this to be sure my boxes were stuffed with all I might need.  I can admit that I usually tie a lot more than I ever need, but it's what I do.  Unseasonably warm weather was expected that weekend so I had high hopes for a good weekend of fishing.  As usual, the major flows in the area did not disappoint.

My fishing buddies were already in the area, having left the day before while I had to work and attend to some family matters.  The alarm clock went off at 4AM Saturday, and after a quick bite to eat, I was on the road by 4:30AM.  Packing the car the night before helps for a speedy exit in the morning!  I was in Tennessee and meeting up with my fishing buddies by about 9:30AM after a pretty smooth trip south.  We decided to take advantage of the favorable wading schedule and hit the Watauga River all day Saturday.  I tend to fish these rivers in two ways: 1) dry/dropper on the shallower and flatter water and 2) a tandem nymph rig in the deeper and faster water.  I picked up a few fish early on the nymph rig, including a gorgeous wild brown.  I always use 12' leaders in this area, and this time even dropped down a size smaller on the tippet from 6X to 7X.


As we moved downstream from our starting point, we came to a familiar section with some shallower water and lighter currents.  I quickly rigged what was my money setup all weekend, a #18 BWO Klinkhamer trailed by a #20 olive/brown midge on a short dropper.  The action on the midge was fast and furious, with fish in every juicy looking run and seam eating them with reckless abandon.  I also managed a few fish on the dry, but 90% of the fish ate the midge.


After catching several smaller trout, I had another classic take on the midge, pulling my indicator Klinkhamer under the surface.  With 7X I was pretty tentative setting the hook, and immediately knew I had a better fish on that was going to require more finesse to land.  I got the rainbow in the net after one failed attempt, and it was my best fish of the trip.  The rainbow went about 16.5" in my measure net.  If you look really hard you can see the teeny midge in the side of its mouth. 


The following day was unfavorable for wading the Watauga, but the South Holston had a generous wading flow and became our destination.  We all planned on leaving the area shortly after lunch, so we hit a familiar section where we could park close and maximize our time on the water.  I began the morning in some deep runs with pretty swift current, and picked up some fish on a tandem nymph rig.  Both a Frenchie and an Iced Hare's Ear caught fish for me.


Returning to some flat and slow water, I found a load of rising trout.  From what I could tell, the fish were on some BWO's that were coming off the water steadily.  I returned to the same dry/dropper rig as the day before and was surprised to see the fish preferring the midge to the BWO.  It turned into a spot-and-stalk, practically.  Spot a fish rising, give that fish a 2-3' lead and the fish would take the midge about every time.  


As the morning turned into the afternoon, I finally broke off my last olive/brown midge.  It was perfect timing because it was time to eat a quick stream side lunch and hit the road.  The night before, while enjoying some music and brews at Jiggy Rays in Elizabethton, we ordered a large pie with pepperoni and banana peppers to go.  We managed to avoid diving into it Saturday night and finished her off for lunch before starting back home.  As always, I washed down lunch with a cherry Dr. Enuf.


Typically I do not enjoy fishing light tippet.  OK, that's a lie...I deeply resent and hate it.  But, the proof is in the pudding, and I caught a lot of fish on this trip.  I felt I did better than I typically do fishing 6X, so maybe the drop in tippet did help.  Here's a closeup of the fly that did most of the damage.  It's an extremely simple zebra midge pattern with one simple twist, the single strand Krystal Flash tail.  This color combo is referred to by the South Holston Fly Shop as the "Olivia Midge." 


As always, if you're headed to eastern Tennessee to fish the tailwaters, keep a watchful eye on the release schedule using the TVA app for your smart phone, or checking the TVA website.  When the dams are generating water, wading is not usually the safest option.  And remember, there are more than just tailwaters in the area.  If wading conditions can't be found on the bigger water, check out a smaller freestone stream in the area and you'll also find fish.   


Wednesday, December 6, 2017

Tying Tutorial: The Alley-Oop Minnow

Necessity is the mother of invention, so the saying goes.  The fly (as yet still unnamed) I posted in a tutorial a while back ((This one) continued to catch a lot of fish throughout the fall.  But, as the water temperatures in SE Ohio continued to fall and cool, I wanted to try a slight modification to the pattern to make it "hang" a bit more on the pause.  When I need more buoyancy I typically turn to deer hair, and this case was no exception.  By using a slightly longer hook shank and adding a touch of buoyancy at the head, the fly still sinks but at a slower rate.  When the fly is stripped, then paused, it almost suspends in the water like an alley-oop pass waiting to be thrown down with authority.  And that's when this fly is getting eaten for me right now, on that pause.  It creates such an inviting target that even more lethargic fish in cold water are eating it readily.  At a glance this pattern might look complex but it's pretty straight forward. 

Hook - Gamakatsu B10S (size 6)
Thread - 6/0, 100den GSP
Tail - Kiley's Thin Finz (small)
Flash - Lateral scale
Hot Spot/Gills - Ice Dub 
Body - Laser Dub or Bruiser Blend (your streamer dubbing of choice) 
Collar - Deer hair 
Head - Fish Mask (4mm)

Begin by tying in the Thin Finz.  In my experience, it doesn't matter which side of the hook they go on.  Secure the tail down by the tab with several tight turns of thread.


Next, add a piece of Lateral Scale to each side of the tail.  I trim the scale to be a little more than half of the length of the tail.


I prefer to add the Ice Dub for the hot spot/gills in a dubbing loop.  Small size Ice Chenille or Estaz would probably also work.  On larger versions I have used Polar Chenille.  I create the short dubbing loop, add a sparse amount of Ice Dub, spin and wrap it.


I try to end the Ice Dub at about the half way mark on the shank.  Once it's tied in, I like to brush it back a bit to pick it out and sweep it back.  When the fly gets wet, this hot spot bleeds through very nicely.


I use contrasting colors of streamer dubbing for the body.  Here I used Bruiser Blend in Alpha Wolf over White.  I measure the length of the dubbing to be about the distance from the tie in point to the end of the Lateral Scale.  Tie this in facing forward.  Be sure to leave ample space between the tie in point and the hook eye for the collar.


Sweep the dubbing back over the fly, veiling it around the hook point on the bottom, and tie it down. 


I often choose to add some barring or other "artwork" to these.  Here I used a fine black barring on the back of the fly.  I now tie off the 6/0, cut it, and switch to GSP thread for the deer hair.


Clean and stack some deer hair, either belly or body hair, to form your collar.  Measure the length of the deer hair to be about the length of the hook and trim the butts off clean.  Tie in the deer hair with loose wraps to get it situated, then tighten down to flare the hair.  On this version I used gray body hair over white belly hair.  It will not take much deer hair to form this collar, as you still need to be sure you can fit a Fish Mask over the collar on the last step.  Getting a feel for how much hair to use is the toughest aspect of this fly, in my opinion.  Whip finish and cut the GSP.


Sweep the deer hair tips back like you are going to form a bullet head and give the Fish Mask a test fitting.  The fit is typically snug and you might need to use some pressure to fit it on.  I add a little super glue to the inside of the Mask, push it on, and put a small thread dam between the mask and hook eye with the 6/0 thread.


Glue on the appropriate sized eyes for the mask, and the fly is complete.


My experience with this fly so far is that it casts very easily (I fish this size on 3wt glass often), behaves a lot like a soft plastic jerk bait in the water, and the fish love it.  It's now December in Ohio, far from prime fishing weather and conditions, and this fly is still raking in fish.  The Thin Finz twitch and wiggle with the slightest movement, and the extremely slow fall of this pattern has been too much for the resident river crappies to take.  I have tied this fly in both sizes 6 and 2, and plan to add it to my bass arsenal for next spring.