Monday, April 24, 2017

Jig Fly Field Testing (And some Field Testing Tips)

On Saturday morning I headed out to a nearby secluded public pond for some field testing of a new (to me, at least) jig style fly.  The rationale behind the newer design was to maintain the "bass jig" profile, but reduce the overall weight.  I wanted the fly to be more easily castable, as well as slowing the sink rate down.  My thought was that this could be fished as a traditional jig, hopping along the bottom, or also be fished fast like a swim-style bass jig.  I ditched the tandem craw style tails which cut out one magnum rabbit strip, slimmed down the underbody by avoiding the deer hair from previous jig flies I have tied, and reduced the weight in the head.  Instead of a medium set of dumbbells, I tied a single 3/16" tungsten bead belly scratcher style at the 60* bend on the hook.  I also added a set of 3D eyes to top it off.


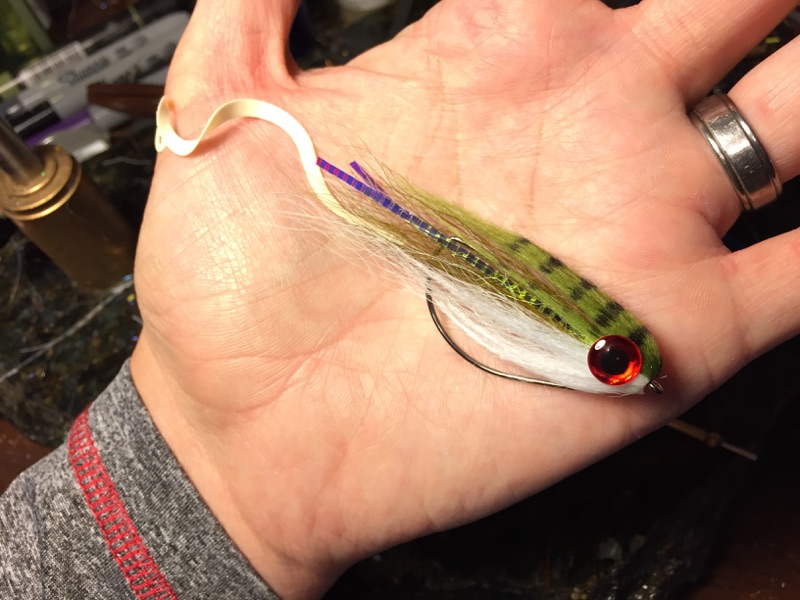
The official recipe of this fly is as follows.

Hook - 60* jig hook 2/0
Tail - Magnum zonker strip/sparse flash, short tuft of arctic fox underneath the zonker
Weight - 3/16" tungsten bead, bell scratcher style, at the bend of the jig hook
Body - Ice Chenille (or Estaz), two colors of Schlappen
Eyes - 3D 
Wing - Rubber legs

Testing this fly on Saturday is what started me thinking about this post, how to better test and trial your patterns to get the most bang for your buck, so to speak.  Here's a short list of things I do and items I carry to help make the process work well.  

  1. I tank test everything before I ever go to fish them.  A sink or tub can also work, especially if you don't need current flow to fully test the pattern.  I built my own test tank for about $10 out of my pocket.  I got a free clear plastic hamster cage that was in a family member's basement, and the water pump I ordered on Amazon for about $10.  Tank testing showed the weighting for the first version of this jig fly was too light, and the fly rolled point-down.  I was able to fix the issue right in my tying room before ever hitting the water.  Not every fault will be found in the tank, but it catches a lot of them.
  2. Carry a spool of lead or non-lead wire with you.  I read this tip from Blane Chocklett, and it's a big help.  It's a clever way to, on the run, add some additional weight to a pattern if it needs it.
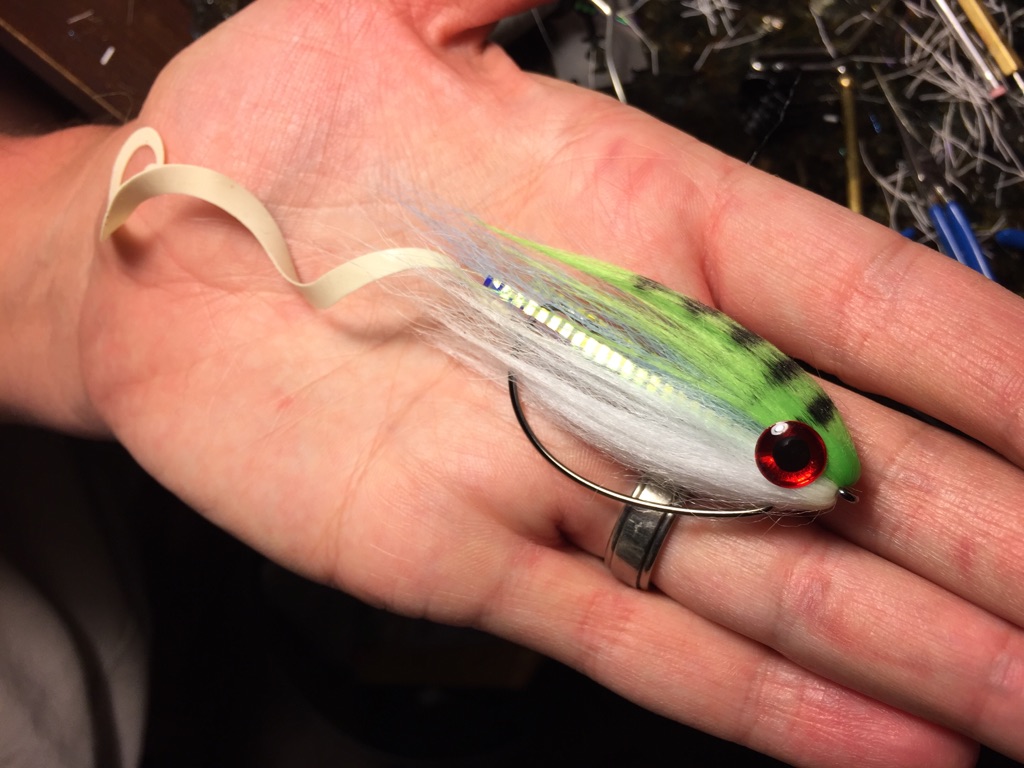
  3. Carry a pair of scissors for anything that might need trimmed.  In the case of this jig fly, the skirt was a bit too long.  After casting and retrieving the fly a few times, I saw the skirt was tangling/fouling around the hook.  I pulled the scissors out and trimmed about half an inch from the legs.  The look and profile of the pattern was unaffected, but the legs stopped fouling after the trim.
  4. This is the hardest of all for me to stick to: don't go overboard on different color combos or tie a dozen of an untested pattern.  It's a recipe for material waste disaster.  After I have tank tested, I tie no more than 3 color combos of a pattern until I have proven it is worth the time and material investment.
On a chilly, slow day at the pond, the new jig pattern put a couple of fish in hand.  I was pretty pleased with how the testing went, and now will go forward with tying a few more colors to add to the box.  For anyone who uses a lot of rubber legs, look into the Boss brand bass skirts.  There's a great array of colors, and they are priced pretty well.  The color combo above used a Boss skirt in "Crazy Gill."


Monday, April 17, 2017

Paddle Board Carpin'

About a month ago, I made the jump from a sit on top (SOT) kayak to a stand up paddle board (SUP).  I have been (not so) patiently waiting for the weather conditions to be fair enough to bring some carp into the shallow mud flats of the local lakes so I could give the board its first good trial run.  Saturday morning was that time.  The weather looked perfect for carp fishing with warm air temperatures and light winds, but the water was still chilly and very cloudy from the barrage of recent rains.  Nevertheless, I loaded the Kahuna onto my Jeep and headed for the lake.


The board was not the only new product I was trying for the first time.  Because I want to limit how often I am reaching for my gear bag or fly boxes while on the board, I bought a Tacky Tube over the winter to keep the flies I expect to use easily at hand.  After I reached the water, I loaded up the tube and clipped it to my belt loop.  This gave me quick and easy access to whichever black fly I wanted to try.  In murky conditions, I typically don't fish any other color.


Once I got the board on the water, I spent the first 10-12 minutes just paddling around, standing a little, and generally getting a feel for the board.  I was highly impressed with how easy the Kahuna paddled and at the stability while standing.  


Although the weather conditions were perfect for a glassy surface, usually making it easier to spot fish, the fish just weren't feeding aggressively.  I did not get many targets to cast to until I changed my location slightly to a small bay off the main flat.  There, I blew my first shot by incorrectly guessing which position the fish was in.  That's where murky water comes into play in a major way.  Instead of my fly dropping right in front of the fish's face, it hit his body.  Game over.  As I was slowly paddling back to the main flat, I spotted a good bubble line close to the boat.  I quickly dropped the fly in there and the indicator twitched.  Fish on!


I used my stake out/push pole to anchor myself in place while I fought the fish.  Early in the season, with the water temps being cool, this fish did not put up the typical fight with big runs.  Instead, it dogged on the bottom, pulled some drag, but never too much.  On the 2nd attempt, I got the fish to the net and onto the board.


Shortly after releasing the fish, my father-in-law showed up with his drone hoping to get some fun aerial action shots, but I never hooked up again while he was there.  He missed the action by a few minutes.  This shot, however, shows you just how murky the water was.


The fly that tricked that carp was my #1 carp producer, a fly I nicknamed Smaug after the giant dragon from the Hobbit movies.  My assumption is they take it for a large dragonfly nymph, but it could be mistaken for a small fish, leech, or craw.  This fly accomplishes a couple of very important things for a carp fly on a mud flat.  It has a strong/bold outline to help fish see it, has a slow sink rate, and its tail stands upright at rest.  My most productive carp patterns typically have a buoyant tail that stands up.  


It was a great first test of the Kahuna SUP.  I never got dunked, I was able to cruise the flats quietly and get on fish, and the perspective being higher on the water is going to be a huge help in spotting fish.  Once the weather really warms up here, it should be game on. 


Monday, April 10, 2017

Worm Hooks for Bass Flies

When I was going through my hook drawers and taking inventory last week, I came across a few packs of Texas-rigged worm style hooks for bass that I hadn't played with in a long time.  There's not a lot of real estate on these hooks to tie material on, so you have to do what you can with a small amount of space.  I've seen several flies by guys like Sam Looper and Gunner Brammar using worm hooks lately, and it got the ball rolling on something new.

What I really wanted to do was incorporate a Slow Rolla tail somehow, but the problem was going to be fouling.  How could the tail be added...and where on the hook...to minimize fouling and make it look natural?  My solution was to use some heavy mono, doubled over and tied in so that the mono would not interfere with the hook point but still position the tail behind the hook.  I did this using 20lb mono, doubled over, and secured in the vise.  I tied the Slow Rolla to the stub of doubled mono (about 1/2" section).


When tied in, the mono does the primary goal quite well: positioning the tail.  It's stiff enough to keep the tail where it needs to be, but flexible enough to easily push out of the way of the hook on a strike.  The extra benefit to this is snag resistance.  When I tested this fly in a pond yesterday, I purposely casted the fly into cover, both woody and vegetation.  This fly did not hang on cover one time.


The remainder of the fly is actually quite simple.  I tied in a small amount of bucktail to provide a little body to the fly.  The only flash I added was a single piece of lateral scale to each side on top of the bucktail.  I then topped the fly off with craft fur reverse tied, and added a little barring and 3D eyes.   


The bass in the pond yesterday were very sluggish after back-to-back nights with lows in the low 30's.  I had virtually no strikes on any of the standard bass fodder, my usual Murdich Minnows and other streamer patterns.  This fly did provoke two strikes, but both were tentative short strikes at the tail.  They were just not fully committed, but the fact that this pattern did get a few strikes and some interest was a good sign, to me.  I tied the test patterns on a 1/0 extra wide gap bass worm hook, which seems to be the "wheel house" size for this pattern.  It's tough to go smaller because worm hooks don't come much smaller.  I did try a 3/0 version last night which turned out fine, but is a bit bigger than most bass flies I use.


The recipe for the original is as follows:

Hook - extra wide gap worm hook 1/0
Tail - Slow Rolla medium size tied to 20lb mono
Body - bucktail
Flash - Lateral Scale
Head - craft fir/Psuedo Hair
Eyes - 3D


Monday, April 3, 2017

Jig and Pig for Fly Rods

There are a few "bass jig" flies out there, but having tied and fished the known patterns I was never fully satisfied with them.  I decided to try and come up with an alternative that fished the way I wanted.  Since I fish more shallow water for bass (ponds and lakes), I wanted: a slower fall, the tail of the fly up at rest, and to try to better match the outline/profile of the conventional jig and pig.

As is usually the case, Attempt #1 was a near miss.  I was tying a fairly large bass fly on a 2/0 60 degree jig hook, and used standard rabbit strips instead of magnum strips, which I should have used.  I also trimmed the rabbit strips a touch too short for my liking.  Otherwise, I liked the rest of the fly.  In the tank, the fall was correct and the tail stood up, as hoped.


I remedied those issues on the next version, sticking with the same color combination of olive/brown/craw orange.  The updated version with the magnum zonkers in the tail also tank tested really well.  In order to "spread" the zonker strips like crayfish claws, I utilized the deer hair technique I use in the HD Craw.  This also provides a little buoyancy in the tail, as well as slows the fall of the fly a bit.


Satisfied that I had the pattern the way I wanted it, I wanted to tie a test pattern in my favorite bass jig color: black and blue.  I just had one problem...I didn't have black or blue magnum zonker strips.  My solution was to take some grizzly zonker and dye it in dark blue dye.  I wasn't sure what to expect, but I was pretty happy with the way these turned out.


Here's the official recipe that I followed for this pattern.  One thing I think a lot of folks would add, that I did not, was a rattle to the underbody.  This would be a very easy addition, so if you want a rattle, tie one in.  The rubber legs I use are actually made for bass jigs, from a brand called Boss.  I get these skirts from Bass Pro Shops, and they are a great value.  5 full skirts are under $4, and the colors are really awesome.

-Hook: 60 degree jig hook size 2/0
-Eyes: medium dumbbells
-Antennae: rubber legs
-Spreader: deer body hair
-Claws: magnum zonker strips
-Hackle: two schlappen feathers in coordinating colors
-Underbody: Estaz
-Collar: rubber legs